Spooky Halloween Marble Cake
Title: The Ultimate Halloween Showstopper (Spooky Halloween Marble Cake)
As the leaves turn and a crisp chill starts to fill the air, I can’t help but feel that magical thrill of Halloween creeping in. I vividly remember the first Halloween party I hosted in my tiny apartment years ago. I had a grand vision of spooky decorations, themed cocktails, and an impressive dessert that would leave my friends talking until next year. But as I stood in the kitchen surrounded by an overwhelming amount of ingredients and a clock ticking relentlessly, I was filled with doubt. Would my concoction even be edible? The pressure to impress was mounting, and I needed a breakthrough. That’s when I discovered the joy and whimsy of a Spooky Halloween Marble Cake. This delightful treat not only satisfied my sweet tooth but also served as a showstopper that had all my guests squealing with delight.
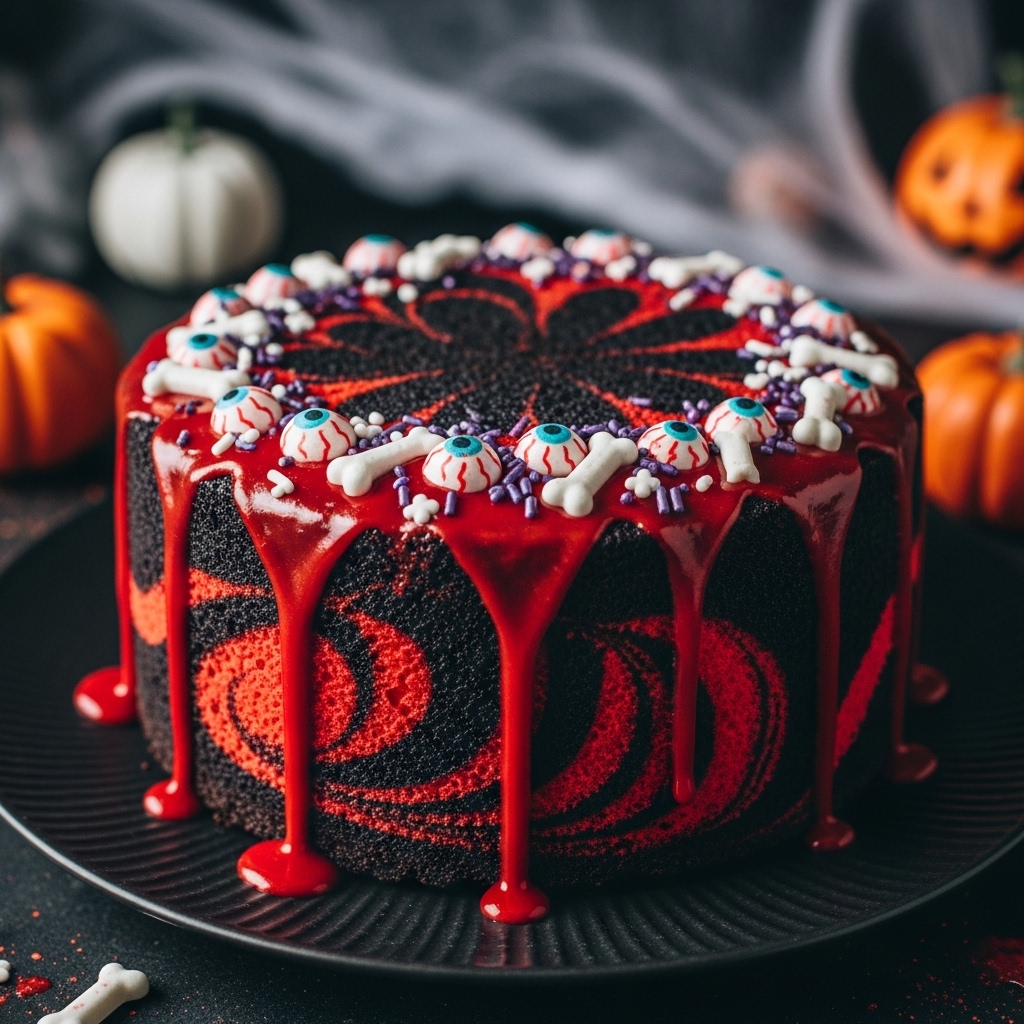
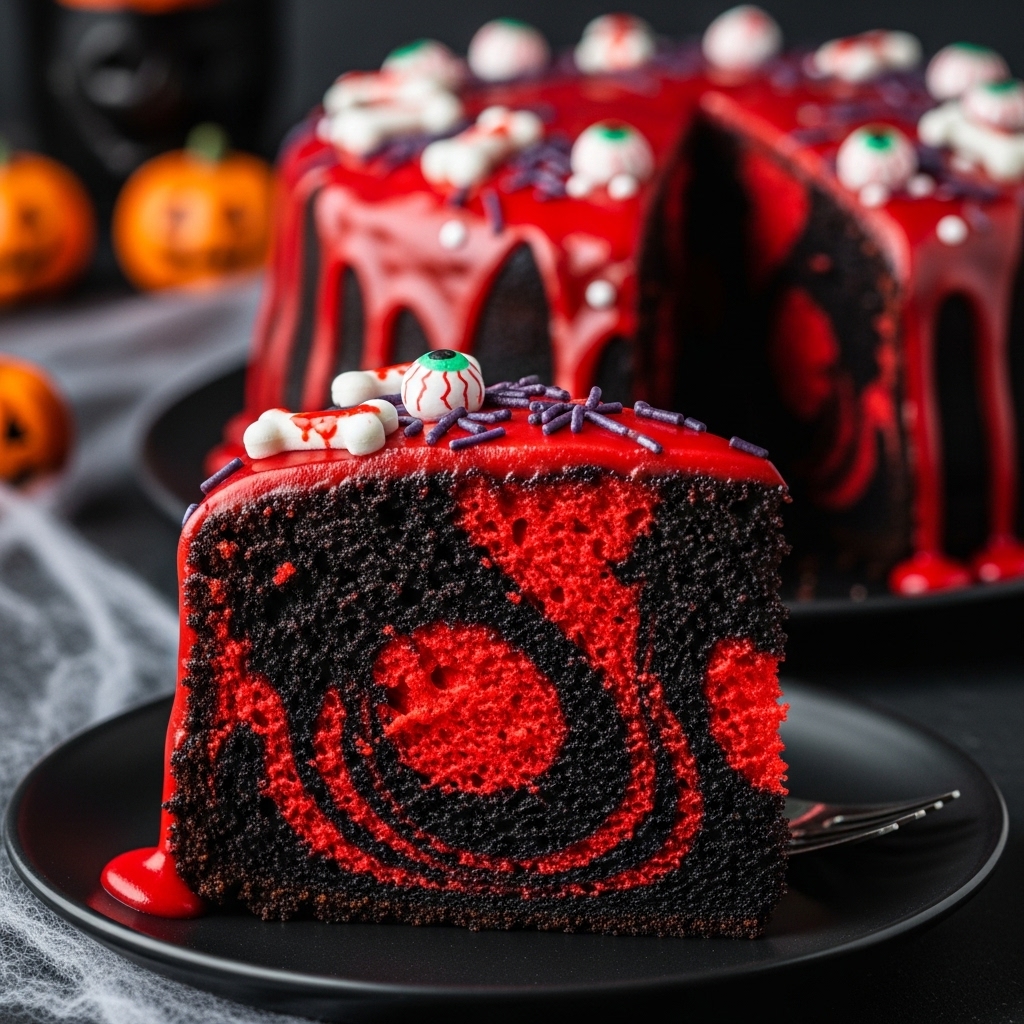
This cake, with its haunting red and black marble, topped with drippy red “blood” and spooky sprinkles, is my go-to solution for every Halloween gathering. It’s visually striking, incredibly delicious, and yes, surprisingly easy to whip up—making it the perfect answer to the age-old dilemma of how to impress guests without losing your sanity.
Why This is Halloween Cake Gold
Let me tell you why this Spooky Halloween Marble Cake is nothing short of a Halloween miracle:
– Visually Stunning: The marbled effect is not only eye-catching but also creates an air of mystery—just the right touch for a spooky soirée.
– Deliciously Decadent: With a moist and rich flavor profile, this cake is a perfect blend of chocolate and vanilla that caters to all palates.
– Make-Ahead Friendly: Bake it a day or two ahead, letting the flavors develop while you focus on the fun parts of hosting.
– Customizable: You can adjust the colors and decorations to match any theme or personal taste.
– Kid-Approved: My friend Sarah brought her two little ones to my last Halloween bash, and they couldn’t get enough of the “blood” icing and sprinkles!
Honestly, when Sarah declared it the “best Halloween cake ever,” I felt like I had officially made it as a host!
Essential Components
To create this eerily enchanting cake, you’ll want to gather a few essential ingredients that not only contribute to the flavor but also enhance the cake’s spooky aesthetic.
– All-Purpose Flour: The foundation of any good cake, it provides the structure and body needed for that perfect crumb.
– Unsalted Butter & Vegetable Oil: A mix of both keeps the cake rich and moist. The butter adds flavor while the oil ensures a tender texture.
– Sugar: Sweetness is key, but it also helps with moisture retention, giving you that delightful bite.
– Eggs: A binder that also adds richness and color; they’re crucial for that beautiful marble effect.
– Bittersweet Chocolate: For the hauntingly rich chocolate side of the marble, it adds depth and complexity to the flavor.
– Gel Icing Colors: The black and red colors are what make this cake truly spooky—after all, it’s Halloween!
Note: You’ll find the complete list of ingredients, along with their exact measurements, in the printable recipe card at the bottom of this post.
Creating Halloween Cake Magic
Ready to conjure up some cake magic? Let’s get right into it!
1. Prep the Cake Batter: Start by preheating your oven to 350°F (175°C) and greasing two 9-inch round cake pans. In a bowl, whisk together 2 1/4 cups of all-purpose flour, 2 1/2 tsp baking powder, 1/4 tsp baking soda, and 1/2 tsp salt. In another bowl, cream 1/2 cup unsalted butter and 1/2 cup vegetable oil with 1 1/2 cups sugar until it’s light and fluffy—imagine the sweet aroma wafting through your kitchen!
2. Mix in the Eggs and Buttermilk: Add 4 large eggs to the butter mixture one at a time, mixing well after each addition. Then, stir in 1 tbsp vanilla extract and 1 cup buttermilk until combined. This step makes the batter silky smooth and adds a delightful tang.
3. Divide and Color: Melt 5 oz of bittersweet chocolate in a microwave or over a double boiler. Once melted, divide your batter in half. Mix one half with the chocolate, adding black gel icing color until you reach a deep, dark hue. Leave the other half vanilla and make it spooky by coloring it red with gel icing color.
4. Layer it Up: Now comes the fun part! Alternate scoops of chocolate and vanilla batter into the prepared pans. Use a knife or skewer to swirl them together gently — this is where your marble cake takes shape!
5. Bake: Pop the pans into the oven and let them bake for about 20 minutes or until a toothpick comes out clean. The sweet smell will draw everyone into the kitchen, and you’ll feel like the cake wizard you truly are.
6. Prepare the Frosting: While the cakes cool, let’s whip up some spook-tacular frosting! Beat together 2 1/4 cups unsalted butter with 8 cups powdered sugar and 1 cup unsweetened cocoa powder, adding 2 tsp vanilla and enough water/cream to reach your desired consistency. Add black gel color for a haunting look!
7. Decorate: Once your cakes are cool, frost the layers and the top generously. Melt 4 oz of red candy melts with 2 tbsp of heavy whipping cream, then drizzle it over the cake like dripping blood. Finish with your favorite spooky sprinkles for that extra fright!
Insights & Why It Works
What makes this Spooky Halloween Marble Cake a true showstopper? It’s a combination of technique and creativity. The swirling method not only looks impressive but ensures every slice is a flavorful surprise. The bittersweet chocolate adds that chocolatey depth that pairs beautifully with the sweet vanilla, creating a balance that’s hard to resist.
One of the key lessons I learned while perfecting this recipe was the importance of using high-quality chocolate. Opting for bittersweet chocolate with around 60% cacao elevates the cake’s richness while keeping it sweet enough for a crowd. And let’s not forget about the icing! The red drizzle brings the cake to life—it’s like the finishing touch on a masterpiece that transforms an ordinary dessert into something magical and memorable.
Hosting can be stressful, but with this cake, you’re not just serving dessert; you’re creating an experience. It’s about the laughter, the compliments, and the shared memories around the table that make these moments so special.
Perfect Halloween Presentation
Presentation is everything, especially for a cake meant to impress! You could place your Spooky Halloween Marble Cake on a black cake stand for dramatic flair, or sprinkle some fake spider webs around for that creepy touch. Consider serving it with a side of vanilla ice cream, which contrasts beautifully with the rich flavors. A few Halloween-themed plates and spooky napkins can also add a festive touch to your table.
Creative Variations
The beauty of this cake lies in its adaptability! Here are a few fun variations to consider:
– Vegetarian-Friendly: Substitute eggs with an equal amount of applesauce for a moist cake without the eggs.
– Different Themes: Use green and purple gel colors for a monster-themed cake or orange and black for a classic Halloween vibe.
– Add-Ins: Toss in some chocolate chips or chopped nuts to the batter for an extra surprise in every bite.
– Frosting Flavors: Experiment with flavored extracts like almond or coconut in your frosting for a unique twist!
Make-Ahead Magic
Let’s talk about the genius of make-ahead magic! This Spooky Halloween Marble Cake can be baked a day or two in advance. Simply store the cooled cakes, wrapped in plastic wrap, in the fridge. Frost it on the day of your party, and watch as your guests marvel at your effortless hosting skills. By preparing ahead of time, you can relax and enjoy your own Halloween festivities instead of being stuck in the kitchen!
Halloween Cake Success Tips
– Don’t Overmix: When combining the batters, mix just until combined to keep the cake light and fluffy.
– Use Room Temperature Ingredients: This helps to create a smooth batter and ensures everything blends beautifully.
– Check for Doneness: Ovens vary, so keep an eye on your cakes; they may need a bit more or less time depending on your oven.
– Let It Cool Completely: Ensure your cakes are completely cool before frosting to avoid a melty mess!
Final Thoughts
Remember that Halloween party I mentioned? That Spooky Halloween Marble Cake was the highlight of the night, and it made me feel like a hosting pro. I realized that it’s not about perfection but about creating an atmosphere of joy and a sense of togetherness. With this cake, you’ll not only impress your guests but also enjoy the process of celebrating with them. So, roll up your sleeves, unleash your inner cake magician, and let the festivities begin!
Frequently Asked Questions
Can I make this cake the night before?
Absolutely! Bake and cool the cakes, then wrap them in plastic wrap and refrigerate overnight. Frost them on the day of your event for the best results.
How do I prevent the cake from sinking in the middle?
Make sure to properly measure your ingredients and avoid overmixing the batter. Also, ensure your oven is preheated and at the correct temperature.
Can I use different colors for the cake?
Of course! Feel free to mix and match colors for your theme. Just remember to keep the gel colors vibrant.
What’s the difference between gel colors and liquid food coloring?
Gel colors are more concentrated and provide brighter, more vivid colors without adding extra liquid to your batter.
How can I store leftovers?
Wrap slices in plastic wrap or store them in an airtight container. They’ll stay fresh for up to 3 days at room temperature or a week in the fridge.