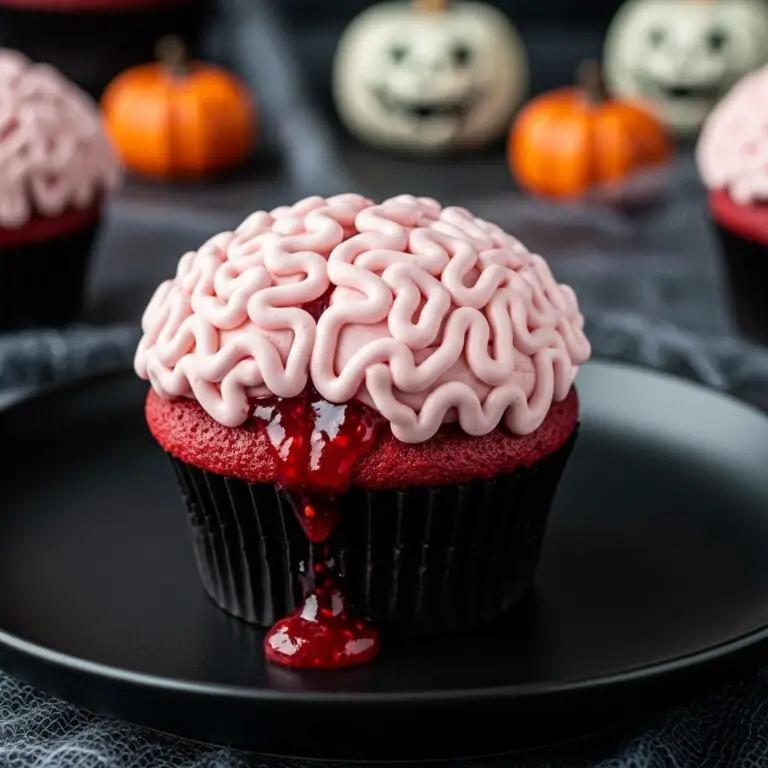
Halloween Cake Pops
Spooktacular Cake Pops That Will Steal Halloween Night (Halloween Cake Pops Recipe)
There’s something magical about Halloween—the crisp air, the crunch of leaves underfoot, and of course, the delight of seeing the neighborhood kids (and adults!) dressed as ghosts, superheroes, and everything in between. I remember a few years back, hosting our first Halloween party in our new home. My mind was a whirlwind of decorations, costumes, and, of course, treats. Only one thing lingered in the back of my mind: how on earth was I going to manage the food and still enjoy the festivities? Enter these adorable Halloween Cake Pops!
These little bites of joy not only bring a festive cheer to your table but also solve the age-old dilemma of how to serve something that feels special without being too time-consuming. They’re a delightful way to satisfy your guests’ sweet tooth while allowing you to mingle and enjoy the evening.
Why These Are Halloween Cake Pop Gold
These cake pops are not just cute; they’re a game changer for any Halloween gathering!
– Quick and Easy: With a boxed cake mix as the base, you can whip these up in no time. Perfect for those who don’t have hours to spend in the kitchen.
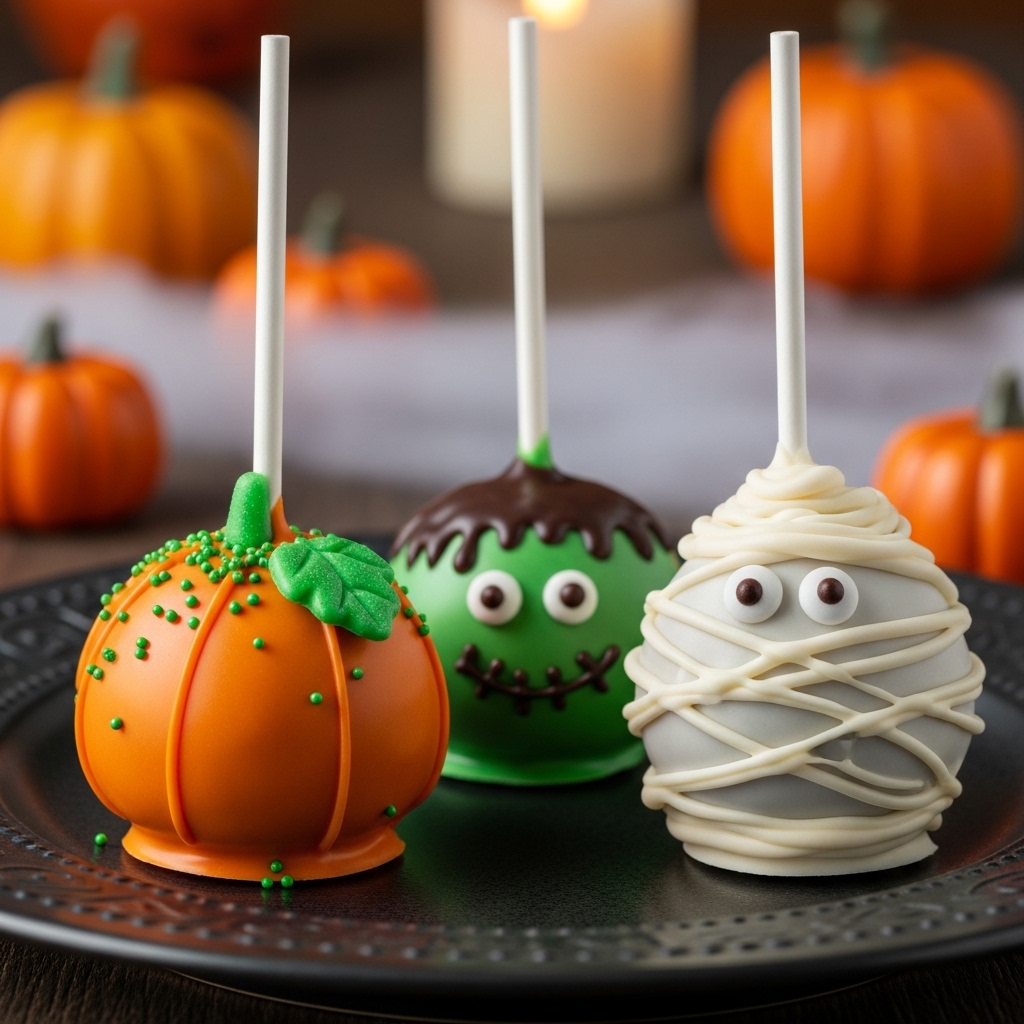
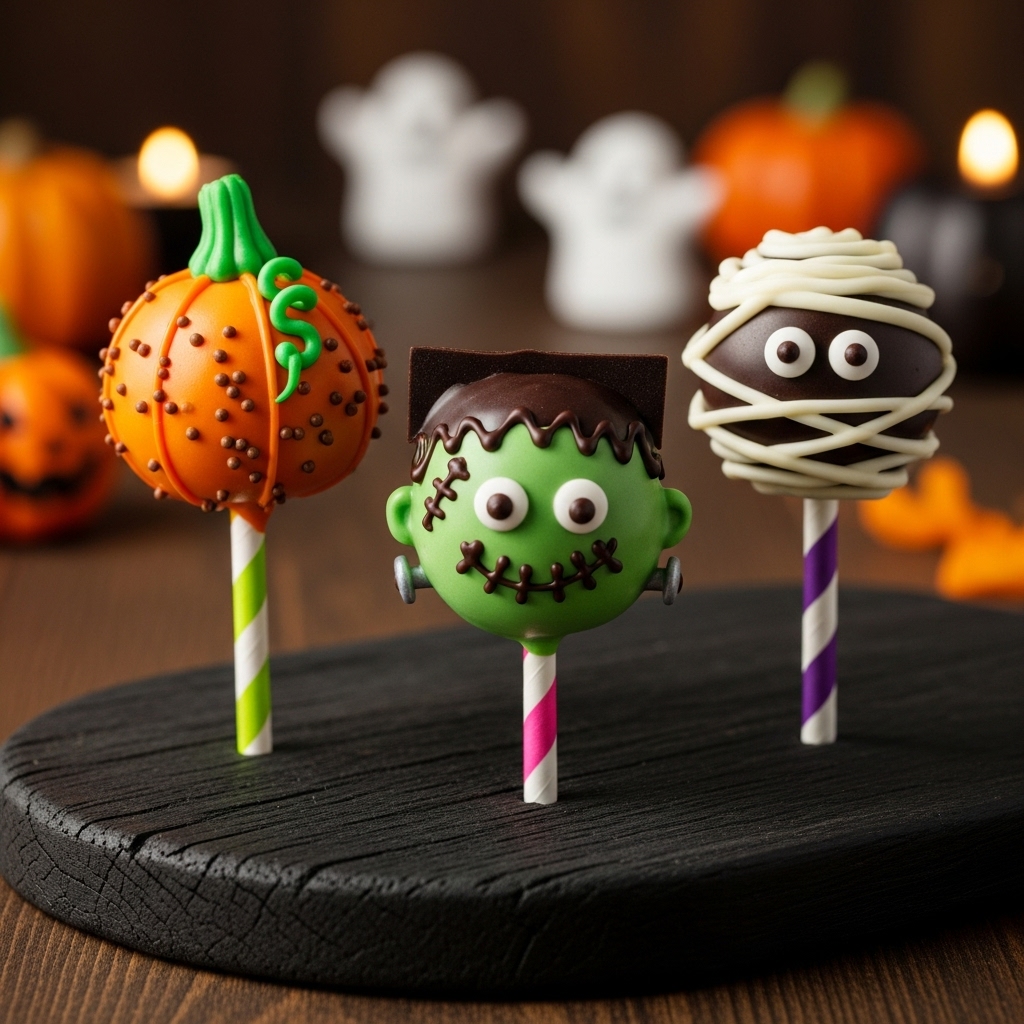
– Customizable Decor: Whether you want a classic pumpkin, a spooky mummy, or a friendly Frankenstein, the decorating possibilities are endless!
– Make-Ahead Magic: You can prepare these little nibbles ahead of time, leaving you stress-free on the day of your party.
– Kid-Friendly Fun: Kids adore them, and they can even help decorate, making them a fun family project!
I can’t forget my friend Lisa’s reaction when she tried them at my Halloween party last year. “These are genius! I get to be festive without losing my mind in the kitchen. Plus, the kids loved helping decorate them!” Talk about a win-win!
Essential Components
The magic of these Halloween Cake Pops comes from a few simple and essential ingredients.
– Cake Mix: Your favorite flavor lays the perfect foundation. Chocolate or vanilla works beautifully—just like our childhood favorites!
– Instant Pudding Mix: This little packet keeps the cake moist and adds a rich flavor; it’s like a secret weapon for cake pop success.
– Frosting: The glue that holds your cake pop together. Use your favorite flavor to infuse a bit of personality into your pops.
– Candy Melts: These colorful melts create a delicious coating and a canvas for your spooky designs.
– Toppings: Sprinkles, candy eyes, and other fun decorations bring these cake pops to life.
Note: You’ll find the complete list of ingredients, along with their exact measurements, in the printable recipe card at the bottom of this post.
Creating Halloween Cake Pop Magic
Let’s dive into the fun of making these spooky delights!
1. Preheat and Prep: Start by preheating your oven to 350°F. While it warms up, give your 13 x 9 pan a light spray with vegetable pan spray to ensure your cake pops slide out easily.
2. Mixing It Up: In a large bowl, combine your cake mix, pudding mix, eggs, water, and vegetable oil. Beat at medium speed for about two minutes until it’s well blended. You’re aiming for a smooth, luscious batter that begs to be licked off the spatula!
3. Bake the Base: Pour your cake batter into the greased pan and pop it in the oven for about 30-40 minutes. Keep an eye on it, and check with a toothpick in the center—it should come out clean. Once it’s done, let it cool in the pan for about 10 minutes.
4. Crumble, Crumble: Now comes the fun part! Using your hands (or two forks if you prefer), crumble the cooled cake into a large bowl until no large chunks remain. It’s like therapy, I promise!
5. Frosting Time: Add the frosting to the crumbled cake and mix with your fingers until everything is well combined. Get in there; this is where the magic happens!
6. Form the Balls: Roll the mixture into small balls, about the size of a golf ball. Place them on a parchment-lined baking sheet, and make sure they’re nice and round.
7. Chill Out: Pop those formed cake balls in the refrigerator for at least two hours. This will help them firm up and make dipping easier.
8. Melt the Melts: While the cake balls chill, melt your Candy Melts in 30-second intervals in the microwave, or use a stovetop method. Just be patient; you want them smooth and silky!
9. Insert the Sticks: Dip the ends of your lollipop sticks into the melted candy and insert them into the cake balls. This step ensures the sticks stay put. If you’re in a hurry, you can place them in the freezer for about 20 minutes to set.
10. Dip and Decorate: Once the candy coating is firm, dip the cake pops completely in the melted Candy Melts. Let any excess drip off. Now here’s where you can unleash your inner artist—sprinkle on your decorations while the chocolate is still wet.
Insights & Why It Works
What truly makes these Halloween Cake Pops a standout is their adaptability. You can tweak the flavors, colors, and decorations to fit any theme, not just Halloween. The pudding mix is a little secret I learned from a baking mentor years ago—it keeps the cake moist and gives each bite a sumptuous texture that sets these pops apart from standard cake balls.
Additionally, the make-ahead aspect is a lifesaver. By preparing them in advance, you’re allowing yourself the freedom to enjoy the festivities instead of being tethered to the kitchen. I’ve learned that the best parties are those where the host is part of the fun, not just a behind-the-scenes worker. And let’s not forget the joy of watching kids (and adults) get creative while decorating their cake pops. They’ll be proud of their edible art!
Perfect Halloween Presentation
When it comes to serving these Halloween Cake Pops, presentation is key! Display them in a spooky mason jar filled with colorful candy corn, or stand them upright in a block of floral foam that you can wrap in a creepy cloth. For an extra touch, add some themed signage like “Witch’s Treats” to elevate the festive feel.
Creative Variations
These cake pops are a blank canvas—here are some creative variations to try:
– Flavored Cake Mix: Use a spice cake mix for a fall-inspired twist or peppermint for a festive winter variation.
– Colorful Melts: Use different colors of Candy Melts for a rainbow of Halloween treats—think green for Frankenstein or purple for a witch theme.
– Creative Toppings: Swap out sprinkles for crushed nuts, coconut, or even edible glitter for a glam touch.
– Mini Cake Pops: Instead of full-size pops, roll smaller bites for a poppable treat that guests can grab and go.
Make-Ahead Magic
These cake pops shine as a make-ahead treat. You can prepare the cake mix and bake it the day before your event. Once your cake balls are formed and chilled, they can be stored in an airtight container in the fridge for up to a week. Just dip them in candy melts and decorate the day of your gathering for the freshest taste. This method guarantees you’ll have delightful dessert ready to impress without the last-minute stress!
Halloween Cake Pop Success Tips
– Don’t Overmix: When combining the frosting with crumbled cake, mix just enough to incorporate everything; overmixing can lead to a denser texture.
– Chill Thoroughly: Make sure the formed balls are well chilled; this helps them hold their shape during dipping.
– Use a Deep Bowl for Dipping: Having a high-sided container for your melted Candy Melts makes dipping much easier and neater.
– Get Creative with Sticks: Try using different types of sticks—like colorful lollipop sticks or even pretzel sticks for a fun twist!
Final Thoughts
Reflecting on that first Halloween party, I feel a warm wave of gratitude. These cake pops not only helped me impress my friends, but they also allowed me to enjoy the evening rather than fret in the kitchen. They’re a celebration on a stick, making you look effortlessly organized and capable of hosting a spooktacular event!
So go ahead—embrace the Halloween spirit with these delightful cake pops that are sure to be the star of your celebration. Get your family involved, have some fun, and watch as your guests rave about your creative treats. You’ve got this!
Frequently Asked Questions
1. Can I make these the night before?
Absolutely! Prepare the cake balls and chill them in the fridge overnight. Just dip in candy melts and decorate on the day of your event.
2. How do I prevent the cake pops from falling off the stick?
Make sure to dip the stick in the melted candy before inserting it into the cake ball. This “glues” it in place.
3. Can I use a different type of frosting?
Yes! Feel free to explore different frosting flavors such as cream cheese or chocolate. Just keep the consistency in mind.
4. What’s the difference between candy melts and chocolate chips?
Candy melts are designed to melt smoothly and set up well, making them ideal for coating cake pops. Chocolate chips can clump and may not give the same effect.
5. How do I store leftover cake pops?
Store them in an airtight container in the refrigerator, separated by layers of parchment paper. They’ll stay fresh for up to 5 days!