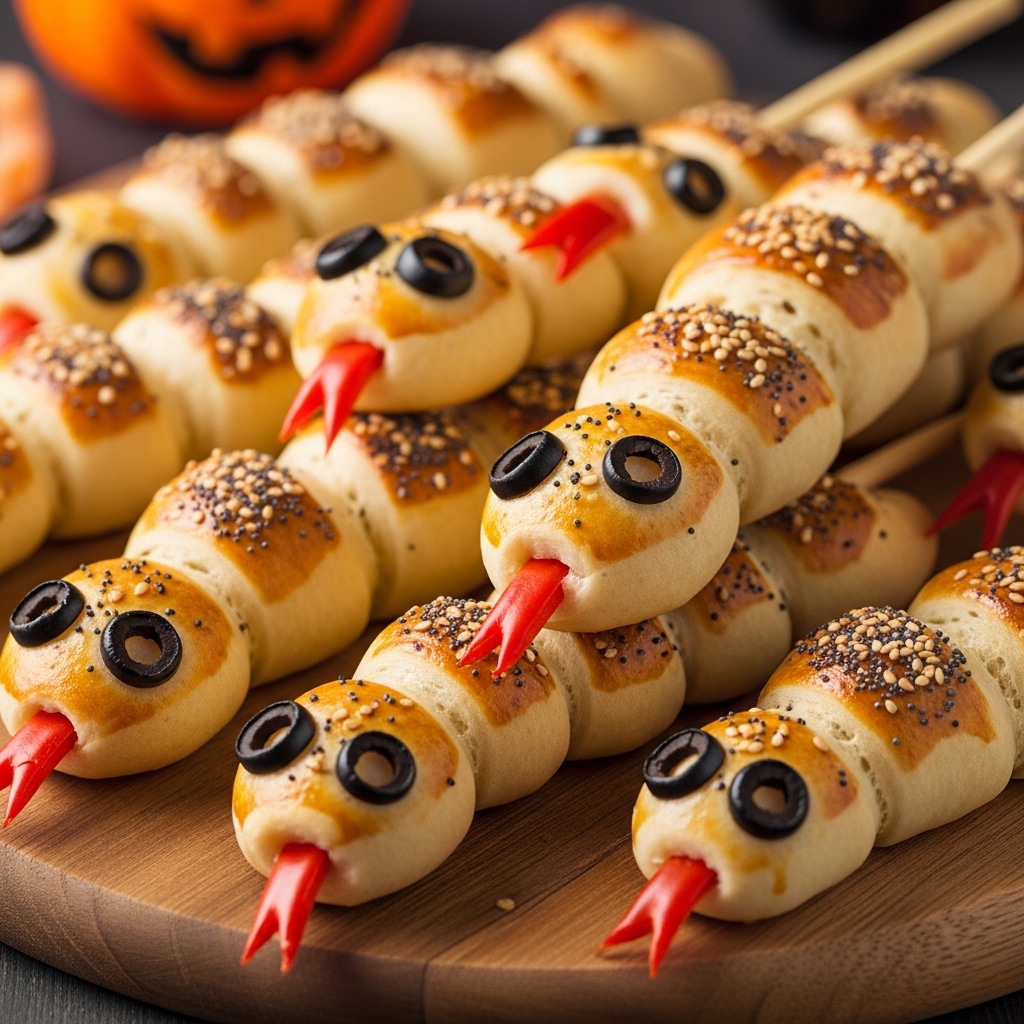
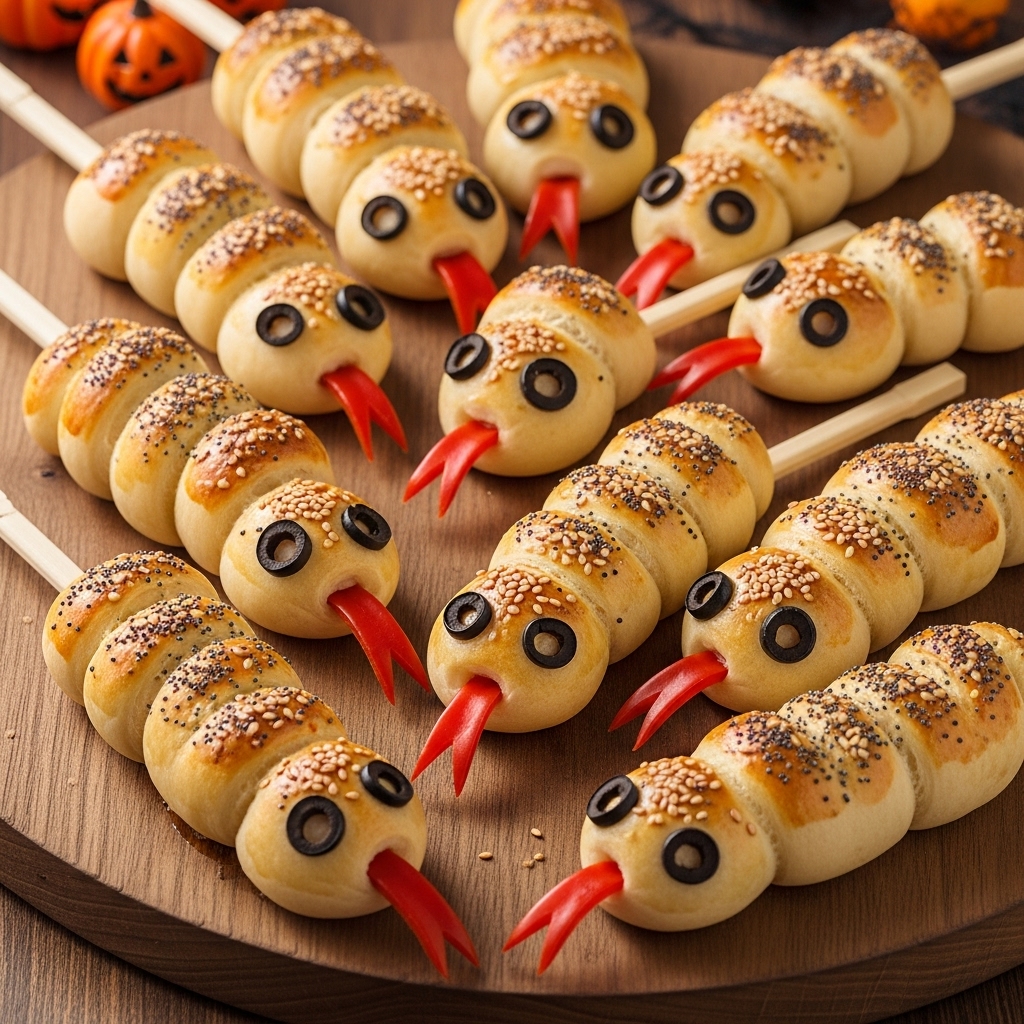
Breadstick Snakes
Slithering into Charm: The Ultimate Snake Breadsticks for Your Halloween Bash (Fun & Spooky Breadstick Recipe)
As the sun sets and the chill of October wraps around us like a cozy blanket, I can’t help but feel that delightful thrill in the air—Halloween is just around the corner! I remember hosting my first-ever Halloween party in college, where I set out to impress my friends with a spread that was both spooky and delicious. I was filled with excitement, but truth be told, the whole affair quickly turned into a bit of a culinary disaster. My ambitious plans of pumpkin soups and ghoulish desserts fell flat, and I was left with a mountain of takeout menus instead.
But then, in a moment of inspiration, I stumbled upon a simple yet playful recipe that not only saved the day but also became a staple in my Halloween entertaining toolkit: Snake Breadsticks. These whimsical creations are not only easy to make, but they ooze charm and are a guaranteed hit with both kids and adults alike. Perfect for snacking or as a savory side, they are the ultimate solution to that common dilemma—how to dazzle your guests without losing your mind in the kitchen!
Why These Are Halloween Treat Gold
– Quick and Easy: With just a handful of ingredients and minimal prep time, you can whip these up in no time, leaving you free to enjoy the festivities.
– Kid-Friendly Fun: Watching the kids get involved, shaping their own snakes and decorating them with olives and peppers, is a delightful bonus that encourages creativity.
– Perfect for Parties: These breadsticks are ideal for gatherings—they’re easy to grab and eat, making them a perfect finger food.
– Customizable: Get creative! You can add your own twist to the recipe, whether it’s spices or toppings, making them your own.
– Guaranteed Smiles: I still remember my friend Becky’s wide-eyed excitement when she first saw these on the table. “This is the coolest thing I’ve ever eaten!” she exclaimed, and that’s the magic of these snake-shaped delights.
Essential Components
To craft these playful Snake Breadsticks, you’ll need just a few key ingredients that each play an integral role in creating that spooky yet delicious effect.
– Refrigerated Pizza Dough (13.8 ounces): The base of your snakes, this dough is a time-saver and gives you that warm, fluffy texture we all crave.
– Black Olives: These little gems serve as the creepy eyes of your snakes, adding a touch of saltiness that perfectly complements the bread.
– Red Bell Pepper: Cut into forked tongues, these add a pop of color and a hint of sweetness to contrast the other flavors.
– Olive Oil (2 tablespoons): Brushing the dough with olive oil before baking not only gives it a beautiful golden hue but also enhances the flavor.
– Poppy Seeds and Sesame Seeds: These seeds add a delightful crunch and a bit of visual intrigue, making your snakes even more appealing.
*Note: You’ll find the complete list of ingredients, along with their exact measurements, in the printable recipe card at the bottom of this post.*
Creating Snake Breadstick Magic
Let’s dive into the fun part—making these slithery delights!
1. Preheat the Oven: Start by preheating your oven to 350°F (175°C). This ensures that your snakes will bake to golden perfection.
2. Prepare the Eyes and Tongues: Chop the black olives into small pieces for the eyes and slice the red bell pepper into forked tongues. Set these aside—this is where your snakes will come to life!
3. Unroll the Dough: Open the tube of refrigerated pizza dough and unroll it onto a clean surface. You’ll love that satisfying “pop” when the seal breaks!
4. Cut & Shape: Using a knife, cut the dough into 12 strips along the long side. Roll each strip into a 12-inch rope, tapering one end for the tail and flattening the other end for the head. Remember, the more organic the shape, the more realistic your snakes will look!
5. Spiral Wrap: Take a greased wooden chopstick or metal straw and wrap each dough rope spirally around it. This fun technique not only shapes your snakes but also provides a perfect handle for baking.
6. Brush & Season: Brush the spiraled snakes with olive oil, then sprinkle them generously with poppy seeds and sesame seeds—this will give them a delicious crunch and a hint of nutty flavor.
7. Add the Eyes: Press the pieces of black olives onto the head of each snake to create those creepy little eyes. If you’ve got kids helping, this is their favorite part!
8. Bake: Place your snakes on two parchment-lined baking sheets and bake them in the preheated oven for about 11 to 15 minutes, or until they are golden brown. Take a moment to inhale the delightful aroma wafting from the oven!
9. Finish with Tongues: After cooling for about 3 minutes, carefully remove the chopsticks. While the snakes are still warm, use a toothpick to thread a piece of red pepper into the tip of each snake’s head for the perfect forked tongue.
Insights & Why It Works
The brilliance of these Snake Breadsticks lies in their simplicity. Using pre-made pizza dough not only cuts down on prep time but also makes the recipe accessible for anyone, even those just starting their cooking journey. I can’t tell you how many times I’ve opted for this recipe when I felt the pressure of hosting creeping in.
The olive oil not only enhances flavor but also gives the breadsticks that gorgeous golden sheen, making them irresistible. And don’t underestimate the power of visual appeal—these snakes are fun to make and even more fun to eat, especially when you see your guests’ delighted faces as they unravel their own creations!
Through years of perfecting these, I learned that letting the kids participate not only lightens the workload but creates memorable moments that are the heart of any gathering. Trust me when I say that a little flour on their cheeks is a small price to pay for the laughter and joy they’ll bring to your kitchen!
Perfect Halloween Presentation
To elevate your Halloween party, consider serving these Snake Breadsticks in a whimsical way. Use a rustic wooden board or a Halloween-themed platter to showcase them. A sprinkle of fresh herbs like parsley or basil can add a pop of color, and a side of marinara sauce for dipping mimics a “bloody” effect! You can also surround them with mini pumpkins or ghost decorations for that perfectly spooky ambiance.
Creative Variations
The beauty of these Snake Breadsticks lies in their adaptability. Here are a few fun variations to consider:
– Cheesy Snakes: Add shredded mozzarella or cheddar cheese before spiraling the dough, creating ooey-gooey snakes.
– Spice It Up: Sprinkle a bit of Italian seasoning or crushed red pepper flakes to give your snakes a bit of a kick!
– No Olives Needed: If olives aren’t your thing, use small cherry tomatoes for the eyes instead.
– Colorful Tails: Incorporate other colorful vegetables like yellow peppers or green onions to create a variety of tongues.
– Sweet Version: Swap the savory elements for a sweet twist by rolling the dough with cinnamon and sugar, then decorating with icing!
Make-Ahead Magic
One of the best aspects of these Snake Breadsticks is their make-ahead potential. You can prepare the shaped snakes and store them in the fridge for a few hours before baking. Just cover them with a damp cloth or plastic wrap to keep them moist. This means less stress on the day of your party! When you’re ready, simply brush them with olive oil and bake as directed. Your guests will think you’ve been slaving away in the kitchen, but little do they know—it was all a clever trick!
Snake Breadstick Success Tips
– Don’t Overbake: Keep an eye on these during baking. Once they turn golden brown, it’s time to take them out!
– Keep the Rolls Connected: For more of a striking presentation, keep your snakes wrapped tightly and connected to create a “snake nest.”
– Use Parchment Paper: This will prevent sticking and make cleanup a breeze. Who wants to deal with extra dishes when there’s Halloween fun to be had?
Final Thoughts
Reflecting on my first Halloween party, I can’t help but smile at how far I’ve come. Now, instead of scrambling for takeout, I’m the one serving up these snaky delights with confidence and flair. The joy of seeing my friends and family gathered around, laughing and enjoying the food I prepared, is what makes hosting truly rewarding.
These Snake Breadsticks not only help you avoid the kitchen chaos but also elevate your gathering into something memorable and fun. So get ready to roll up your sleeves and enjoy a little Halloween magic—you’ve got this!
Frequently Asked Questions
Can I make these the night before?
Yes! You can shape your breadsticks and store them in the fridge overnight, just remember to cover them to keep moisture in.
How do I prevent them from burning?
Keep an eye out in the last few minutes of baking; every oven is different. You want them golden, not dark brown.
Can I use different ingredients?
Absolutely! Feel free to swap out the olives and peppers for other toppings or ingredients that suit your taste.
What’s the best way to store leftovers?
Store any leftovers in an airtight container in the fridge for up to 2 days. You can reheat them in the oven for a few minutes to regain that fresh-baked flavor.
Can I freeze these?
Yes! After shaping, you can freeze them before baking. Just place them on a baking sheet until frozen, then transfer them to a freezer bag. Bake from frozen, adding a few extra minutes to the cooking time.
Now go forth and create your very own snake-filled Halloween feast!