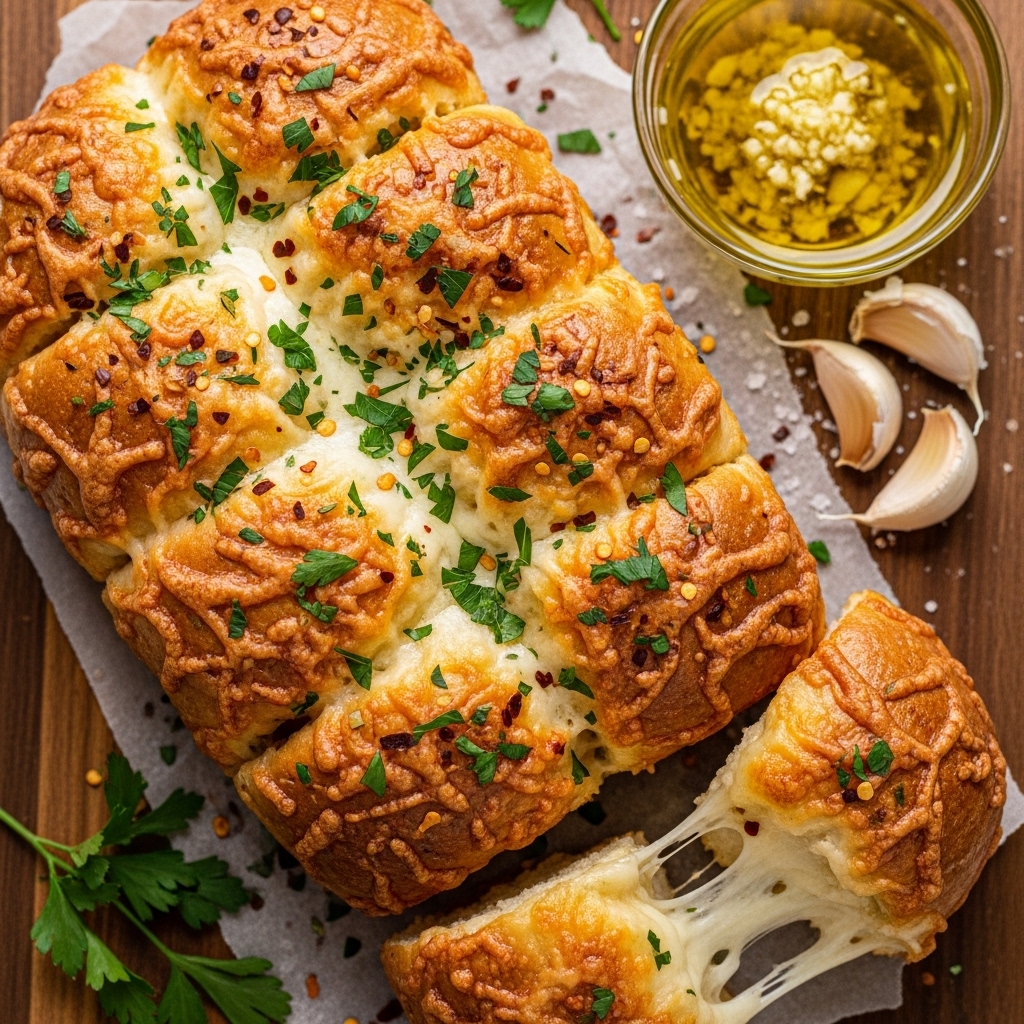
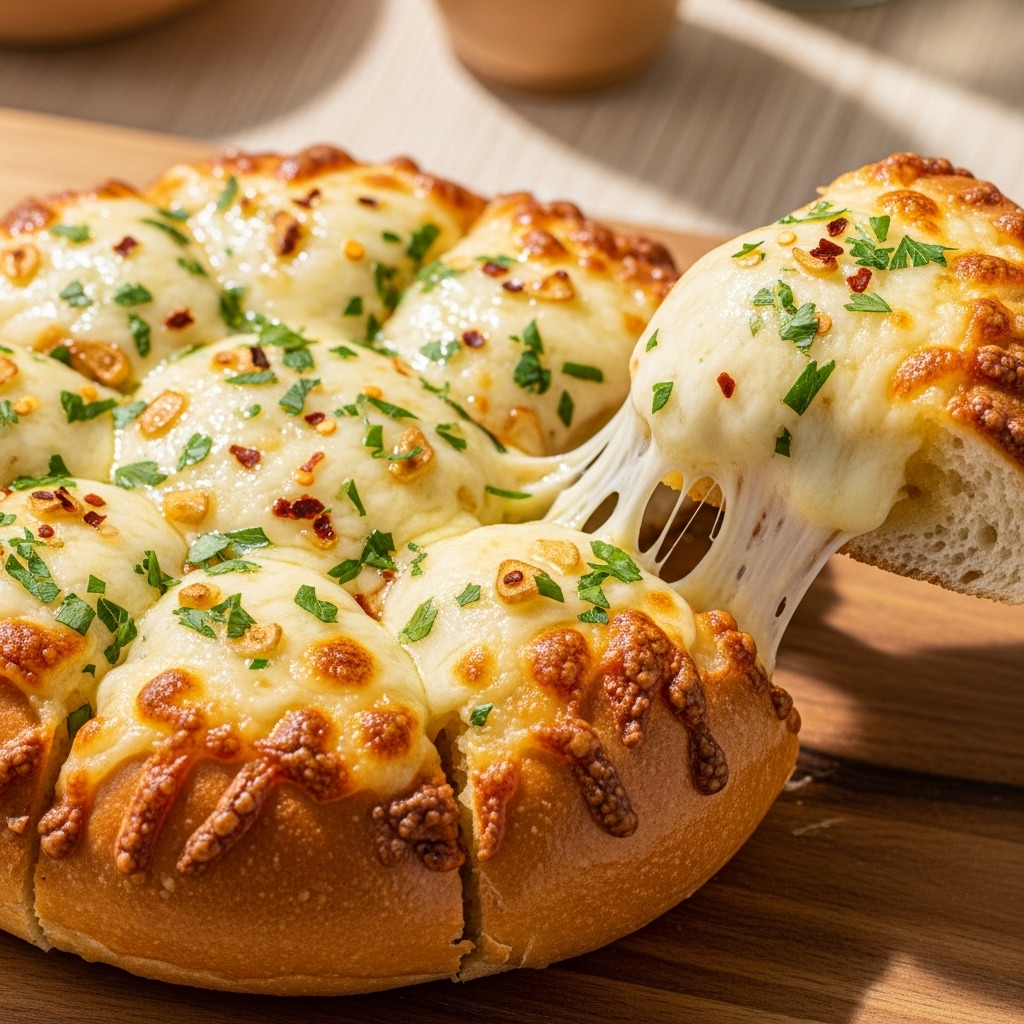
BEST CHEESY GARLIC BREAD RECIPE
Best Cheesy Garlic Bread Recipe: The Ultimate Comfort Food Delight!
Looking for a side that will steal the show at your next gathering? Meet the Best Cheesy Garlic Bread Recipe, a heavenly medley of buttery, garlicky goodness layered with gooey, melted cheese that is crispy on the outside and soft on the inside. This is not just any bread; this is the kind of dish that gets everyone reaching for more, basking in its rich aroma, and savoring every cheesy bite. Perfect for dipping, sharing, or simply indulging in on your own, this recipe is sure to become a staple in your kitchen!
Why You’ll Love This Recipe
You’re going to want to make this Best Cheesy Garlic Bread Recipe over and over again! Here’s why:
– Big, Bold Flavors: With a punch of garlic and a burst of cheesy goodness, this bread is a flavor lover’s dream!
– Crowd-Pleaser: Perfect for parties, family dinners, or movie nights; everyone will be clamoring for a slice!
– Flexible & Fast: Prep is a breeze, and you can whip this up in just over an hour!
– Make-Ahead Magic: Assemble it ahead of time and bake when you’re ready to serve!
Ingredients You’ll Need
The heart of any great recipe lies in its ingredients, and this Best Cheesy Garlic Bread Recipe is no exception! Each component plays a crucial role in creating that perfect balance of flavors and textures.
– 8-10 garlic cloves
– 2 tbsp olive oil
– Pinch of salt
– Roasted garlic from above
– ½ cup butter, melted (113g)
– 1 egg
– ¼ cup milk (60g)
– ½ tsp salt
– ½ tsp paprika
– 2 tbsp chopped fresh parsley
– 12 King’s Hawaiian Original Hawaiian Sheet Rolls (or a French baguette of similar size)
– 2 cups shredded mozzarella cheese
– Chopped parsley and chili flakes for serving
_Note: You’ll find the complete list of ingredients, along with their exact measurements, in the printable recipe card at the bottom of this post._
Variations
The beauty of the Best Cheesy Garlic Bread Recipe is its versatility! Here are some fun tweaks to make it your own:
– Go Gluten-Free: Swap out the rolls for gluten-free bread to cater to dietary needs!
– Add Extra Protein: Mix in some cooked bacon bits or shredded chicken for a heartier option.
– Make it Spicier: Toss in some crushed red pepper flakes or jalapeños to really heat things up!
– Swap the Cheese: Experiment with a blend of cheeses like cheddar or pepper jack for a flavor twist.
– Colorful Additions: Throw in some sun-dried tomatoes or roasted bell peppers for a pop of color and taste!
How to Make the Best Cheesy Garlic Bread Recipe
Let’s get into the nitty-gritty of creating this cheesy masterpiece! Follow these easy steps, and you’ll have everyone raving about your culinary skills.
Step 1: Roast the Garlic
Start by preheating your oven to 400°F (200°C). Peel the garlic cloves and toss them in olive oil with a pinch of salt. Wrap them in foil and roast for about 20-25 minutes, until they’re soft and golden. This will give your garlic a sweet, caramelized flavor.
Step 2: Create the Flavor Base
Once your roasted garlic is cool, mash it into a paste with a fork. In a mixing bowl, combine the melted butter, mashed roasted garlic, egg, milk, ½ tsp salt, and paprika. Whisk it all together until it’s beautifully blended.
Step 3: Assemble the Bread
Slice your Hawaiian rolls in half, keeping them in the full sheet form. Place them on a baking tray, cut side up. Pour the creamy garlic mixture generously over the rolls, allowing it to soak in. Then sprinkle a generous amount of shredded mozzarella over the top!
Step 4: Bake to Perfection
Pop your cheesy garlic bread into the preheated oven and bake for 20-25 minutes, or until the cheese is bubbly and lightly golden. The aroma will fill your kitchen in the best way possible!
Step 5: Garnish and Serve
Once out of the oven, sprinkle with fresh chopped parsley and a dash of chili flakes for that extra kick. Serve warm!
Pro Tips for Making the Best Cheesy Garlic Bread Recipe
– Perfectly Roasted Garlic: Keep an eye on the garlic while roasting; you want it golden, not burnt!
– Don’t Skimp on Cheese: The more cheese, the better! Feel free to layer on more for an ultra-cheesy experience.
– Let it Soak: Allow the butter mixture to soak into the rolls for a few minutes before baking for maximum flavor.
– Keep an Eye on the Oven: Ovens can vary, so check your bread a couple of minutes before the suggested bake time to avoid overcooking.
How to Serve the Best Cheesy Garlic Bread Recipe
Garnishes
Elevate your dish with a sprinkle of fresh parsley and a scattering of chili flakes for a pop of color and flavor!
Side Dishes
Pair this cheesy delight with a fresh side salad, a warm bowl of soup, or even pasta for a complete meal!
Creative Ways to Present
Serve your Best Cheesy Garlic Bread Recipe on a rustic wooden board, or cut it into individual pieces and place them in cute cups for a fun twist!
Make Ahead and Storage
Storing Leftovers
Store any leftover cheesy garlic bread in an airtight container in the fridge for up to 3 days. Just be prepared for the heavenly aroma when you open it!
Freezing
Yes! You can freeze it! Just wrap tightly in plastic wrap and store in a freezer-safe bag for up to 2 months. Perfect for those future cravings!
Reheating
To reheat, simply pop it in the oven at 350°F (175°C) for about 10 minutes until warmed through and the cheese is melty again. You can also microwave individual pieces; just be careful not to overdo it!
FAQs
Can I use a different type of bread?
Absolutely! Feel free to swap the Hawaiian rolls with any bread you love—baguettes work wonderfully too!
Is this recipe spicy?
The base recipe isn’t spicy, but you can easily add heat with chili flakes or jalapeños if you like a kick!
Can I prepare this in advance?
Yes! You can prepare the bread up to the baking step and keep it covered in the fridge for a few hours before baking.
How do I make this gluten-free?
Simply substitute the rolls with gluten-free bread, and you’re all set!
Final Thoughts
There you have it—the Best Cheesy Garlic Bread Recipe that’s destined to impress! With its rich flavors, inviting aroma, and delightful crunch, this dish is the ultimate comfort food that brings everyone to the table. So don your apron, gather your ingredients, and get ready to wow your family and friends with this irresistible treat. Happy baking!