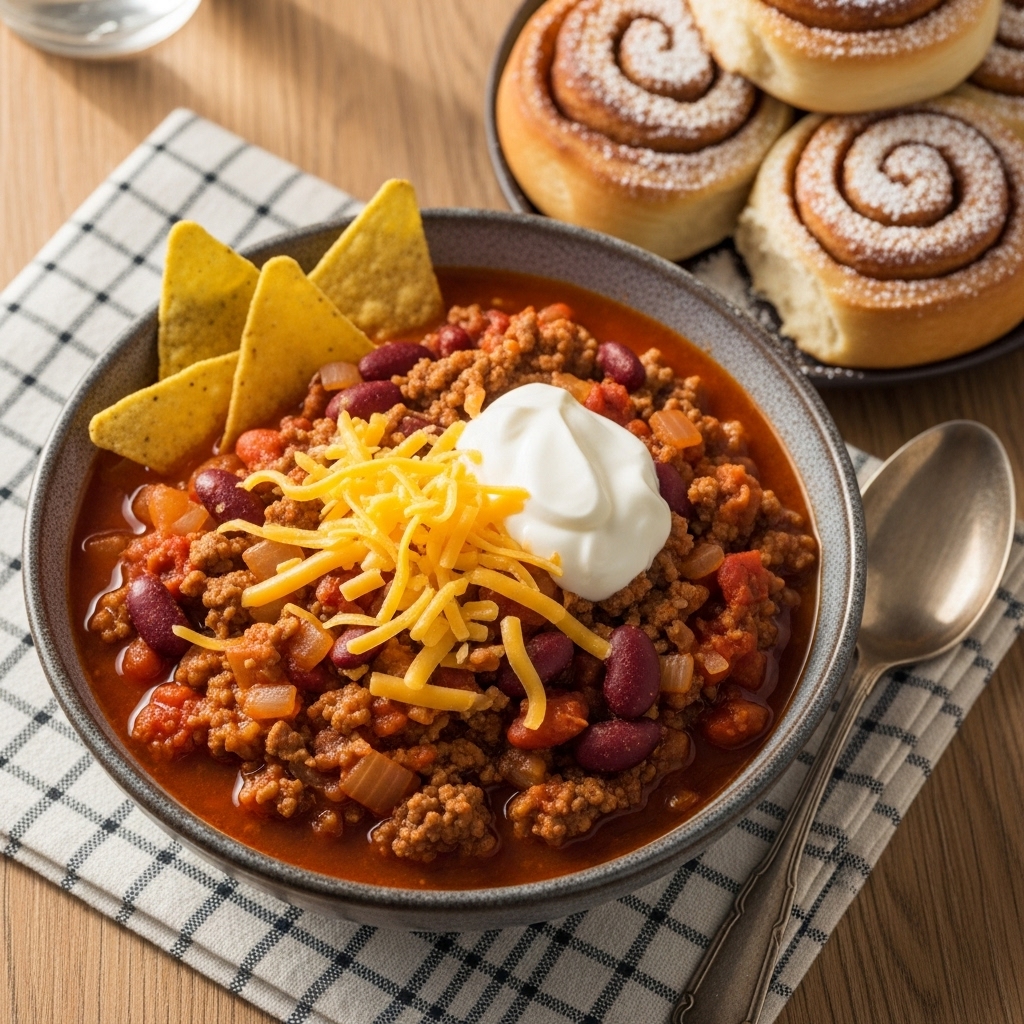
Hillbilly Chili and Cinnamon Rolls
The Ultimate Comfort Food Duo: Hillbilly Chili & Cinnamon Rolls (A Cozy Midwestern Feast)
There’s nothing quite like the feeling of a warm kitchen on a chilly day. I can still recall those late autumn weekends at my Aunt Faye’s house, where the aroma of simmering chili would mingle with the sweet scent of her famous cinnamon rolls. As kids, we’d bounce from room to room, the promise of a hearty meal drawing us closer. Aunt Faye had a knack for turning the simplest ingredients into something magical, effortlessly bringing the family together over a steaming pot of chili and a tray of sticky, gooey rolls.

Fast forward to now, and as a busy mom and food blogger, I often find myself grappling with the same hosting dilemma: how to feed a crowd without losing my sanity. Enter this Hillbilly Chili and Cinnamon Rolls – the ultimate solution for those of us who want to serve a delicious meal that feels nostalgic and comforting while keeping the stress at bay.
Why This Hillbilly Chili & Cinnamon Rolls is Comfort Food Gold
– Time-Saving Duo: With a prep time of just 20 minutes and a cook time of 30, you’ll have a satisfying meal on the table in less than an hour.
– Crowd-Pleaser: This recipe serves up to 8, making it perfect for family gatherings or casual get-togethers with friends.
– Versatile Enjoyment: The chili can be topped with your favorite garnishes – think shredded cheddar, a dollop of sour cream, or crunchy corn chips – allowing each person to customize their bowl.
– Nostalgic Flavors: The combination of chili and sweet cinnamon rolls creates a balance that feels both hearty and indulgent, tapping into those cherished memories.
Last week, I had a friend over for a cooking session, and when I served her this chili with cinnamon rolls on the side, she exclaimed, “This is the type of meal that wraps you in a warm blanket!” I couldn’t agree more; it’s pure comfort food magic.
Essential Components
Every great dish begins with quality ingredients. Here’s what you’ll need to create your own hillbilly chili:
– Mild Chili Powder: This adds the essential warmth and aromatic depth to the dish without overwhelming heat, making it family-friendly.
– Ground Beef (Ground Round or Sirloin): Tender and flavorful, this is the hearty base that gives the chili its satisfying texture.
– Yellow Onion: Diced to perfection, onions bring a sweetness and layer of flavor that’s foundational to any chili.
– Spaghetti or Angel Hair Pasta: Adding broken pasta to the chili gives it a unique texture and heartiness, turning it into a comforting one-pot meal.
– Chili Beans: These not only contribute a lovely creaminess but also infuse additional flavor, making each bite a delight.
– Tomato Juice: The rich liquid base that binds all the flavors together, creating a luscious chili that begs for a thick slice of bread.
– Granulated Sugar, Kosher Salt, and Pepper: Essential seasonings that balance flavors, ensuring your chili is perfectly seasoned.
Note: You’ll find the complete list of ingredients, along with their exact measurements, in the printable recipe card at the bottom of this post.
Creating Hillbilly Chili Magic
Ready to dig into this comforting family recipe? Here’s how to create your own hillbilly chili and cinnamon roll masterpiece:
1. Prep the Ground Beef: In a large pot or Dutch oven, over medium heat, brown 2 lbs. of ground beef until it’s no longer pink, breaking it apart with a spoon as it cooks. This should take about 5-7 minutes. The sizzle is music to your ears!
2. Sauté the Onion: Add 1 medium diced yellow onion to the pot and cook until softened and translucent. The aroma will fill your kitchen, and you’ll be transported back to those cozy autumn days.
3. Stir in the Goodness: Once the onions are ready, stir in 1-2 tablespoons of mild chili powder, mixing well to coat the beef and onion. Let those spices bloom for a minute or two—this is where the magic begins!
4. Add the Pasta: Toss in 4 oz. of broken spaghetti or angel hair pasta, and then pour in 1 can of undrained chili beans and 1 can of 46 oz. tomato juice. Stir everything together, and watch as your chili starts to come alive.
5. Season to Perfection: Sprinkle in 1 tablespoon of granulated sugar, 1 teaspoon of kosher salt, and 1 teaspoon of pepper. Mix well, and let the mixture come to a gentle simmer. Cover and let it cook for about 20 minutes, stirring occasionally.
6. Make the Cinnamon Rolls: As the chili simmers, treat yourself by whipping up a batch of classic cinnamon rolls. You can use store-bought dough for simplicity or follow your favorite homemade recipe. Either way, the sweet aroma will have everyone hovering around the kitchen!
7. Serve with Love: Ladle the chili into bowls and offer toppings like shredded cheddar, corn chips, and sour cream. Serve warm cinnamon rolls on the side. There you have it!
Insights & Why It Works
This Hillbilly Chili recipe is a game-changer for several reasons. Firstly, the inclusion of pasta is a delightful surprise that adds both heartiness and a unique twist, setting this chili apart from traditional recipes. The method of simmering everything together allows flavors to meld beautifully, creating a rich and satisfying dish that warms from the inside out.
The addition of sugar might seem odd in a chili, but trust me—this small step counterbalances the acidity of the tomatoes and enhances the chili’s flavor. It’s those little insights that I’ve gleaned over the years; sometimes, the simplest tweaks make all the difference.
Having a make-ahead meal in your arsenal also alleviates the stress of last-minute cooking. I remember one Saturday morning when guests arrived earlier than expected. I could simply reheat my prepped chili and bake off the cinnamon rolls for a fresh-out-of-the-oven treat. They were none the wiser about my earlier chaos!
Perfect Brunch Presentation
Presenting this chili and cinnamon roll duo can be a treat in itself. Consider garnishing the chili with a sprinkle of fresh herbs like cilantro or green onions for a pop of color. Serve alongside a platter of warm cinnamon rolls drizzled with icing, inviting guests to help themselves. You could even create a chili bar, letting everyone choose their toppings and adding a fun interactive element to your gathering.
Creative Variations
One of the beauties of this recipe is its adaptability! Here are a few ideas to switch things up:
– Vegetarian Option: Substitute the ground beef for lentils or a mix of beans for a delicious vegetarian version.
– Spicy Kick: If you like heat, add some diced jalapeños or a dash of hot sauce to the chili while it simmers.
– Cheesy Delight: Stir in some cream cheese or shredded cheese into the chili for an extra creamy texture.
– Sweet Rolls: Experiment with pumpkin spice or apple cinnamon rolls for a seasonal twist that pairs beautifully with the chili.
– Top with Fritos: For a classic Midwestern touch, consider topping your chili with Fritos corn chips for that extra crunch!
Make-Ahead Magic
One of the key benefits of this hillbilly chili is its make-ahead magic. You can prepare the chili a day in advance, letting the flavors deepen and improve overnight. Just let it cool completely, transfer it to an airtight container, and store it in the refrigerator. When you’re ready to serve, simply reheat it on the stovetop or in the microwave.
The cinnamon rolls can also be made ahead. You can prepare the dough, shape the rolls, and place them in the baking dish. Just pop them in the fridge overnight, and when you’re ready to bake, let them sit at room temperature while your oven preheats. This way, you’ll be stress-free and ready to enjoy your gathering without a hitch!
Hillbilly Chili Success Tips
– Don’t Skip the Simmer: Allowing the chili to simmer is essential for developing those deep flavors. Be patient!
– Stir Occasionally: Keep an eye on your chili while it cooks—give it a stir now and then to prevent the pasta from sticking.
– Taste As You Go: Adjust seasonings as needed. Everyone’s taste is different, so trust your palate!
– Prep Your Toppings: Have a toppings bar ready to go, so guests can personalize their chili just how they like it.
Final Thoughts
As I sit down with a bowl of this Hillbilly Chili and a warm cinnamon roll in hand, I’m reminded of those cherished moments spent around my Aunt Faye’s table. This recipe not only fills bellies but also warms hearts, making it perfect for anyone looking to host effortlessly without sacrificing flavor or nostalgia.
Whether it’s a cozy family dinner or a laid-back gathering with friends, this dish is sure to impress while giving you the time to enjoy the company around you. So grab your apron, put on your favorite playlist, and let’s make some memories—one bowl of chili at a time!
Frequently Asked Questions
Can I make this the night before?
Absolutely! Prepare the chili in advance and store it in the refrigerator. Reheat it when you’re ready to serve.
How do I prevent the pasta from getting mushy?
To avoid overcooking, make sure to stir occasionally and adjust the cooking time based on your pasta choice. Alternatively, you can cook the pasta separately and add it just before serving.
Can I use different meat?
Yes! Feel free to substitute ground turkey or chicken for a lighter option, or go vegetarian with lentils or beans.
What’s the difference between chili powder and mild chili powder?
Mild chili powder is typically less spicy and has a more balanced flavor, making it more suitable for family-friendly recipes.
Can I freeze leftovers?
Yes! Cooked chili freezes well. Just allow it to cool completely, store it in an airtight container, and it will keep for up to three months in the freezer. Reheat thoroughly before serving.