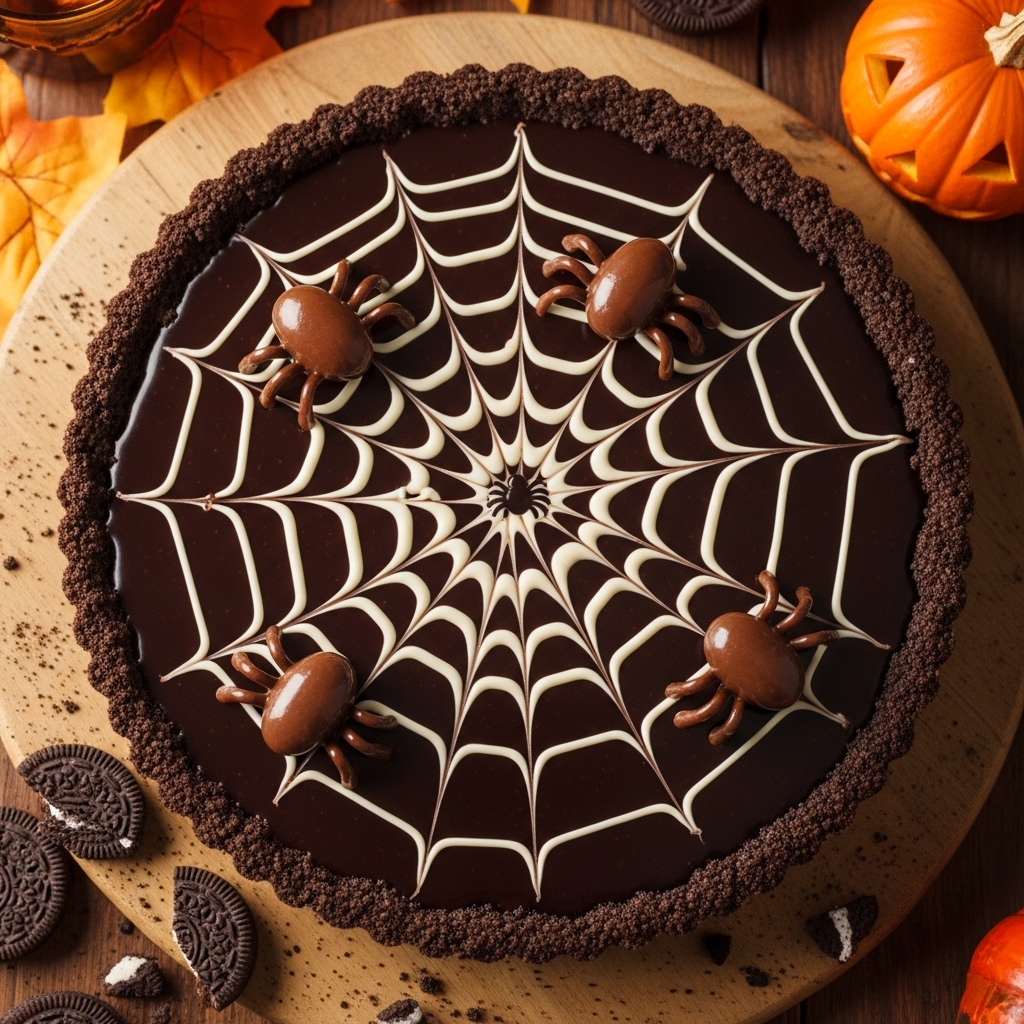
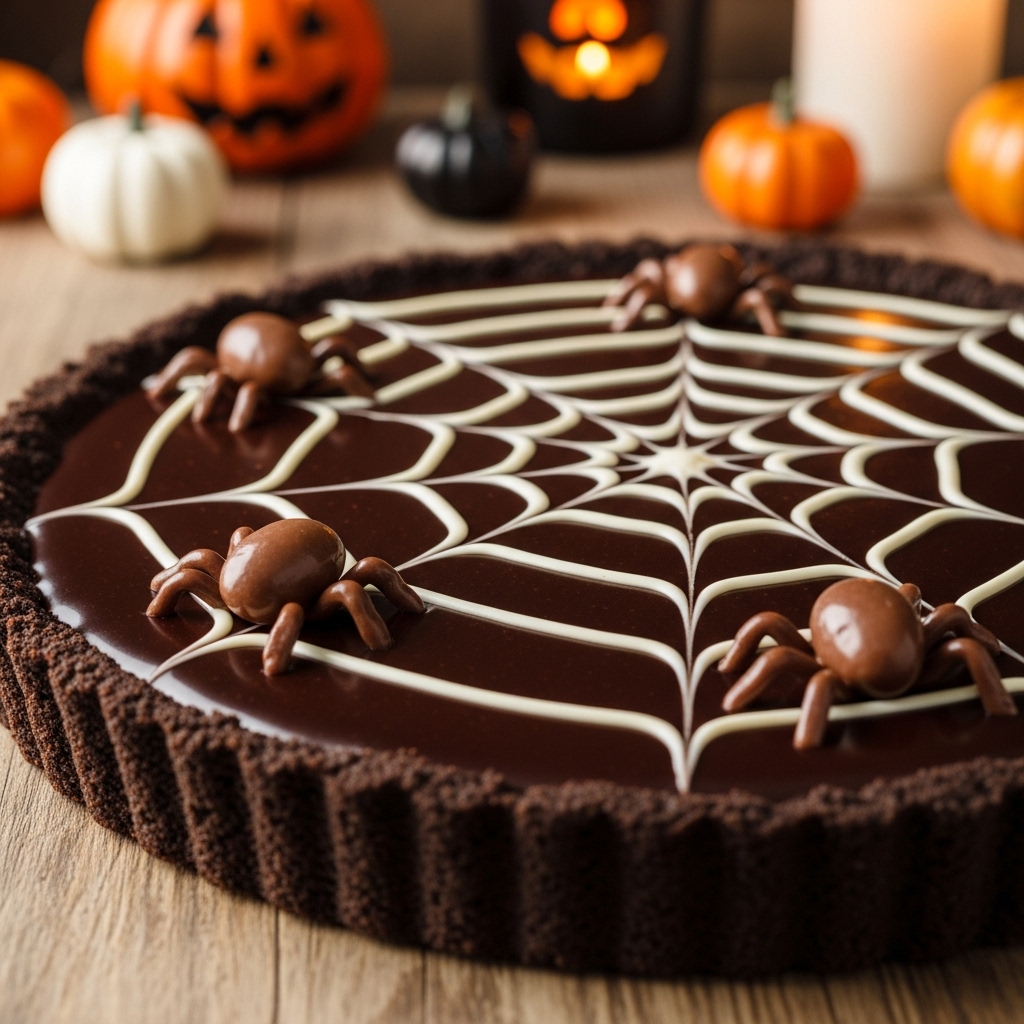
Halloween Chocolate Spiderweb Tart
My Secret Weapon for Spooktacular Gatherings (No-Bake Halloween Chocolate Spiderweb Tart)
Halloween has always been a time for creativity, mischief, and of course, indulgence. I still remember the year my friend Sarah decided to throw a Halloween party and challenged all of us to bring our “A-game” when it came to treats. As we were discussing what to bring, I felt that familiar knot of pressure in my stomach. I wanted to impress, but between the pumpkin carving, costume planning, and the fact that I had limited time to prepare, I knew I needed something that was not only show-stopping but also easy to whip up. That’s when I stumbled across the idea of a Halloween Chocolate Spiderweb Tart.
This tart was a game changer. It’s a gorgeous, no-bake dessert that not only looks like it belongs at a Halloween feast but also tastes decadent and rich. Plus, it allows you to embrace the spooky vibes without being stuck in the kitchen all night. Trust me, this tart is my go-to solution for any Halloween gathering, making it easy to enjoy my time with friends while still bringing something impressive to the table.
Why This Is Halloween Dessert Gold
Oh, it’s not just a dessert; it’s an experience! Here’s why this Spiderweb Chocolate Tart is a must-have for your Halloween festivities:
– No-Bake Ease: Say goodbye to early-morning baking chaos! This tart comes together in under an hour, and it sets while you prepare for your spooky soirée.
– Gorgeous Presentation: With its spiderweb design and edible chocolate spiders, this tart is guaranteed to be the centerpiece of your dessert table.
– Crowd-Pleasing Flavor: Rich chocolate meets creamy goodness, ensuring that every bite has your guests swooning.
– Versatile Base: The Oreo cookie crust adds an irresistible crunch and can be easily swapped out for other cookies if you’re feeling adventurous.
– Fun Factor: Everyone loves a little fright—and the chocolate-covered almond spiders? Total show-stoppers!
I remember when I brought this tart to Sarah’s party; everyone was blown away! One of my friends, Lisa, took one bite and exclaimed, “This is the best Halloween dessert I’ve ever had—are there really spiders in it?” The laughter that followed made my heart swell. It was a success!
Essential Components
To make this stunning tart, you’ll need just a handful of ingredients that come together in a beautifully simple way. Here’s what you’ll need:
– Oreo Cookies: The perfect base! Their chocolatey goodness and crunchy texture create a delightful contrast to the creamy filling.
– Unsalted Butter: Helps to bind the cookie crust together while adding richness and flavor.
– Dark Chocolate: For that deep, rich flavor that elevates the tart to decadent heights.
– Milk Chocolate: A little sweetness to balance the bitterness of the dark chocolate, creating a harmonious blend.
– Heavy Cream: This is the secret to a luscious, silky filling that melts in your mouth.
– White Cooking Chocolate: Adds the perfect touch for creating the iconic spiderweb design.
– Chocolate-Covered Almonds: These crunchy little “spiders” are both delicious and decorative, adding a surprise element to the tart.
Note: You’ll find the complete list of ingredients, along with their exact measurements, in the printable recipe card at the bottom of this post.
Creating Halloween Dessert Magic
Ready to impress your friends with this stunning tart? Let’s get started!
1. Create the Oreo Crust
First, crush those Oreo cookies into a fine crumb. You can pop them in a food processor or place them in a zip-top bag and smash them with a rolling pin—whatever works for you! Mix the crushed cookies with melted butter until the mixture resembles wet sand. Press it firmly into the bottom of a 9-inch tart pan. This step is crucial, so don’t skip it; a solid crust holds everything together beautifully.
2. Prepare the Chocolate Filling
In a small saucepan over medium heat, combine the chopped dark chocolate and one cup of heavy cream. Stir occasionally until the chocolate is fully melted and the mixture is smooth. Remove it from the heat and let it cool slightly before pouring it into your prepared crust. This will create a rich, velvety layer that sets beautifully in the fridge.
3. Whip Up the Milk Chocolate Layer
Next, in another saucepan, repeat the melting process with the chopped milk chocolate and another cup of heavy cream. Once combined, pour this layer gently over the dark chocolate layer, creating a two-tone effect. This is where the magic happens! Allow the tart to chill in the fridge for at least two hours, or preferably overnight.
4. Create the Spiderweb Design
Once your tart is set and ready to go, melt the white chocolate in a microwave-safe bowl. Drizzle it over the top of the tart in a spiral pattern. Then, using a toothpick or skewer, gently pull through the white chocolate to create a spiderweb effect. It’s easier than it sounds and adds a fun, festive touch.
5. Add the Finishing Touches
Finally, place your chocolate-covered almonds on top to resemble creepy spiders waiting to surprise your guests. The dark chocolate against the white web creates a striking visual; your friends will be both impressed and slightly spooked!
Insights & Why It Works
This Spiderweb Chocolate Tart is not just about looks; it’s the simplicity of the no-bake process combined with the decadent flavor that makes it a winner. The layering of dark and milk chocolate not only creates a feast for the eyes but also a delightful contrast of flavors and textures.
One game-changing aspect I’ve discovered over the years is the importance of quality chocolate. Using high-quality chocolate for both layers will elevate your tart from “just okay” to “absolutely divine.” I learned this the hard way during one of my earlier attempts when I used a lower-quality chocolate. Let’s just say, it didn’t have that luxurious mouthfeel we all crave.
Another key takeaway is the chilling time. Allowing the tart to set overnight not only helps the flavors meld beautifully but also gives you a stress-free morning before your gathering. You can avoid any last-minute rushing, leaving you free to enjoy the spooky festivities with your guests.
Perfect Halloween Presentation
To truly complete your Halloween dessert display, consider serving this tart with some whimsical garnishes. A sprinkle of edible glitter can add a magical touch, and a side of whipped cream with a hint of vanilla makes it even more decadent. Pair it up with spooky cocktails or warm apple cider for a delightful fall menu that will impress your guests and keep the spooky fun alive!
Creative Variations
One of the best things about this recipe is how adaptable it is. Here are a few fun variations to consider:
– Switch the Base: Try using crushed graham crackers or even gingersnap cookies for a different flavor profile.
– Nutty Twist: Add a layer of chopped nuts between the chocolate layers for added crunch.
– Fruit Infusion: Incorporate puréed raspberries or strawberries into the milk chocolate layer for a fruity surprise.
– Spice It Up: Add a pinch of cinnamon or cayenne to the chocolate filling for a warm spice kick that pairs beautifully with the chocolate.
Make-Ahead Magic
The beauty of this Halloween Chocolate Spiderweb Tart lies in its make-ahead potential. You can prepare the tart up to two days in advance. After assembling, simply cover it tightly with plastic wrap and store it in the fridge. This way, you can glide into your Halloween celebration stress-free, knowing dessert is already taken care of. All that’s left to do is unveil it at the right moment and watch the delighted reactions from your guests!
Halloween Dessert Success Tips
– Don’t Rush the Chilling: Allow ample time for the tart to set in the fridge; rushing this step can lead to a gooey mess instead of clean layers.
– Quality Matters: Invest in good-quality chocolate; you’ll taste the difference!
– Be Creative with Garnishes: Let your imagination run wild with toppings. Edible glitter, sprinkles, or even gummy worms can enhance the spooky vibe.
– Use a Tart Pan: A tart pan with a removable bottom makes serving a breeze and allows for those stunning edges.
Final Thoughts
Remember that Halloween is about fun, creativity, and spending time with loved ones. With this no-bake Spiderweb Chocolate Tart, you can impress your guests without being tied to the kitchen. Just like that spooky night at Sarah’s party, you’ll be able to share laughter and sweets while looking effortlessly competent. This dessert is sure to become a staple in your Halloween repertoire, making every gathering a little sweeter.
Frequently Asked Questions
Can I make this tart the night before?
Absolutely! In fact, it’s recommended to allow it to set overnight for the best flavor and texture.
What if I can’t find chocolate-covered almonds?
No problem! You can use any type of edible decoration—think gummy spiders or even chocolate-covered raisins.
Can I use different types of chocolate?
Yes, feel free to mix it up! Dark, milk, and even white chocolate can be used, depending on your taste.
How do I prevent the filling from being too runny?
Make sure to let the chocolate cool slightly before pouring it into the crust, and be patient with the chilling time.
What’s the difference between white chocolate and milk chocolate?
White chocolate is made from cocoa butter, sugar, and milk solids, while milk chocolate contains cocoa solids and is sweeter. Both add unique flavors to this tart.
I can’t wait for you to try this Spiderweb Chocolate Tart! It’s sure to become a cherished recipe in your Halloween traditions, just as it has in mine. Happy haunting and happy baking!